Monday, April 28, 2008

Constructing the back of the cabinet


The past couple of weeks I have been busy with sanding and painting the coin door (which wasn't a big success :) and especially with building the backside of the cabinet - which turned out great.

The progress on the coin door is something for another post, probably like when I recieve the door back from a friend who's a professional (spray-)painter.


For the backside of the cab I started out putting the top- and bottom panels in place. As you can see on the pictures they each consist out of two pieces of MDF. One piece of the usual 16mm and another piece ontop which is just 8mm. The bevel created that way is for support of the door and to make the door flush with the rest of the backside. I used the thinner MDF for the door because it doesn't need to be as solid as the rest of the cabinet and that would only make the cabinet heavier.
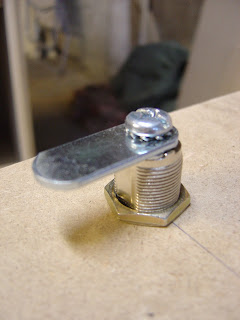


Fixed a nice lock on the topside of the door to - duh - lock it in place. And it gives a real authentic look to it :) I glued a little plinth piece to the inside of the cab where the lock closes, because I had a margin of about 4 mm. But now it's perfectly tight when the door is shut.

Thursday, April 10, 2008

Coin door cut-out

This evening I cut the hole for the coin door with the jigsaw. It went pretty easy. Except, while the hole is perfectly centered, the coin door is 1.5 cm off-center due to the coin door frame itself. Hadn't thought about that before cutting. But who cares. It looks nice! Even though it isn't an original Nintendo coin door. Which bothers me just a little :)


Got my monitor repaired last week. No more hourglass special effect! While running in 800 x 600 resolution (Windows) everything is perfect. In 640 x 480 or something however (prior to Windows, eg. the bootscreen and bios), it's still crooked.. hmmm.. Can't be bothered by it any longer. Those screens flash by quick anyway. As long as all the emulation resolution are fine, it's ok.

Updating my roms to the lastest Mame .024 version. And check it out! No curves left and right! :)

Adjusted my newly ordered coin mechs to 20 Euro cent by the way! After a lot of searching I came across a website which explained it quite well. All we did (rough adjustment for now) was bent the cradle (no. 12 in the illustration) so it accepted 20 Euro cent coins. I did take some photo's of the adjusted mech but those came out very unclear. So, sorry no pics.


And I stripped my computer. Looks a lot cleaner than it did in the old ugly case. I mounted one of my newly aquired 4- 8-way Donkey Kong replica joysticks on my test-panel, looks great. Really close to the original. And plays fine, albeit a little firmer and less precise in diagonals than the Happs competition ones.